If the problem is a steady tonal imbalance instead, begin with EQ fundamentals.
Start by deciding what you want: quieter peaks, more sustained body, less variation between notes or a deliberate rhythmic effect. The same compressor can move the sound in different directions depending on that goal.
Threshold and ratio describe the level rule
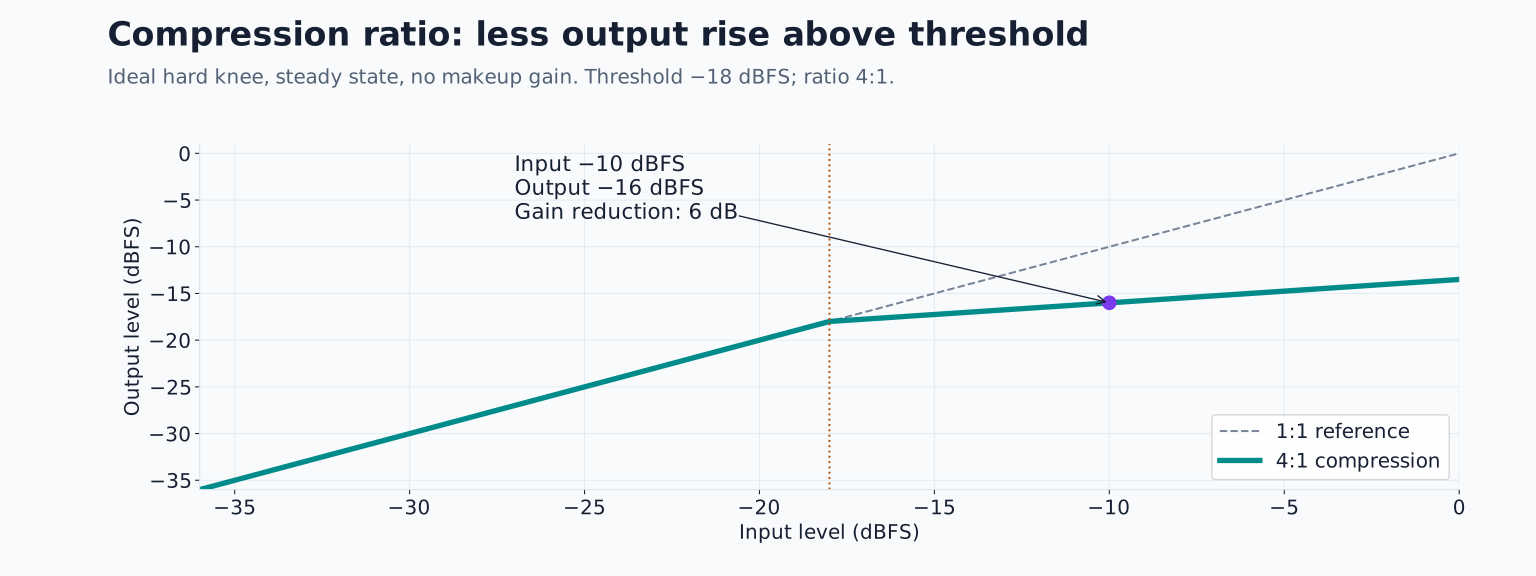
Threshold is the level region where compression begins to act. Lowering it usually brings more of the signal into compression. Ratio describes how strongly level increases above the threshold are reduced.
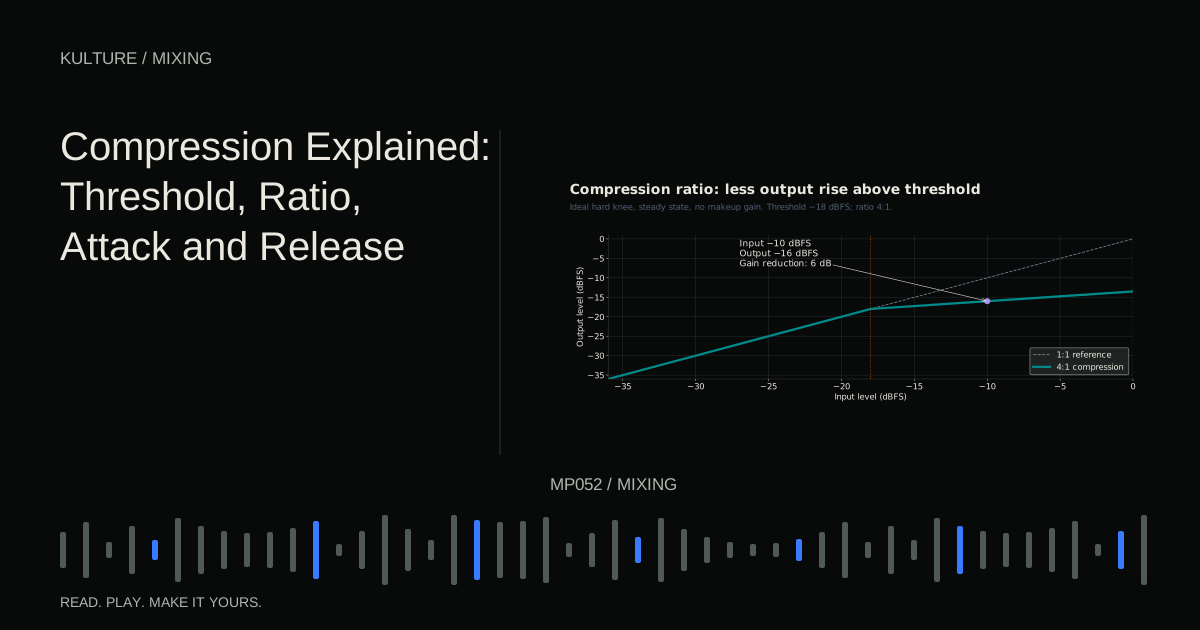
For an idealized hard knee, steady state example, set a threshold of -18 dBFS and a ratio of 4:1. A signal 8 dB above that threshold would emerge 2 dB above it before makeup gain, giving 6 dB of reduction. Real compressors have timing, detector and knee behaviour, so a changing drum hit will not necessarily follow that simplified calculation at every instant.
FabFilter’s basic compressor lesson provides a visual explanation of these relationships. The important practical point is that threshold depends on the source level. Copying someone’s threshold number onto a different recording does not copy their result.
A ratio of 1:1 produces no ordinary ratio based compression. Higher ratios usually restrain increases more strongly, but a high ratio with a high threshold may affect less material than a low ratio with a low threshold.
TRY IT HERE
Explore the transfer curve
See how threshold and ratio change a steady input level.
Ready when you are. Audio starts only when you press Play.
Keep experimenting in the synth LabAttack is a response, not a waiting timer
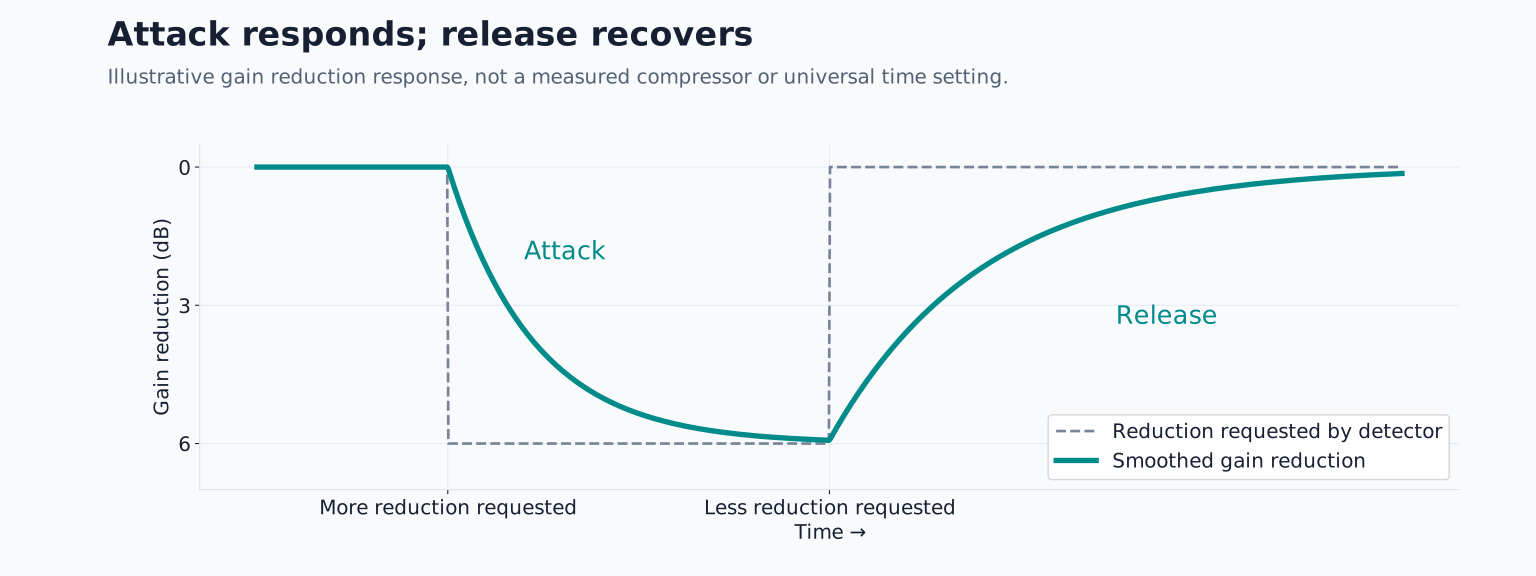
Attack describes how quickly gain reduction responds toward its required amount. It is often misleading to imagine the compressor doing absolutely nothing for the displayed attack time and then suddenly switching on.
A faster attack can reduce the beginning of a transient, meaning a brief initial peak. A slower attack can let more of that beginning remain before the body is reduced. But detector style, knee and program dependent behaviour affect what actually happens. FabFilter’s time control documentation discusses this processor dependent timing.
Use your ears to decide whether the attack becomes too soft or too sharp. A drum can feel punchier when its initial peak remains prominent relative to its body, but it can also become thin if too much body is reduced.
Release controls recovery
Release describes how gain reduction relaxes after the detector no longer calls for as much reduction. A short release may recover between closely spaced hits; a long release may carry reduction across several events.
Too fast recovery can produce audible distortion or chatter on some material, especially when the detector follows low frequency cycles. Too slow recovery can keep the next note suppressed. Neither result is guaranteed by a particular millisecond value, because the source rhythm and compressor design matter.
At 120 BPM, a quarter note lasts 500 milliseconds and an eighth note 250 milliseconds. These durations can help orient a listening experiment, but release does not need to equal a note length. Adjust it while hearing whether the groove breathes naturally.
Knee, makeup gain and the detector
Knee controls how gradually compression transitions around the threshold. A hard knee gives a more distinct transition; a soft knee spreads it over a wider region. This can affect how obvious the action feels.
Makeup gain raises the processed output after reduction. It does not undo the dynamic change; it makes the reduced signal louder overall. Automatic makeup gain can complicate comparisons, so disable it while learning if possible.
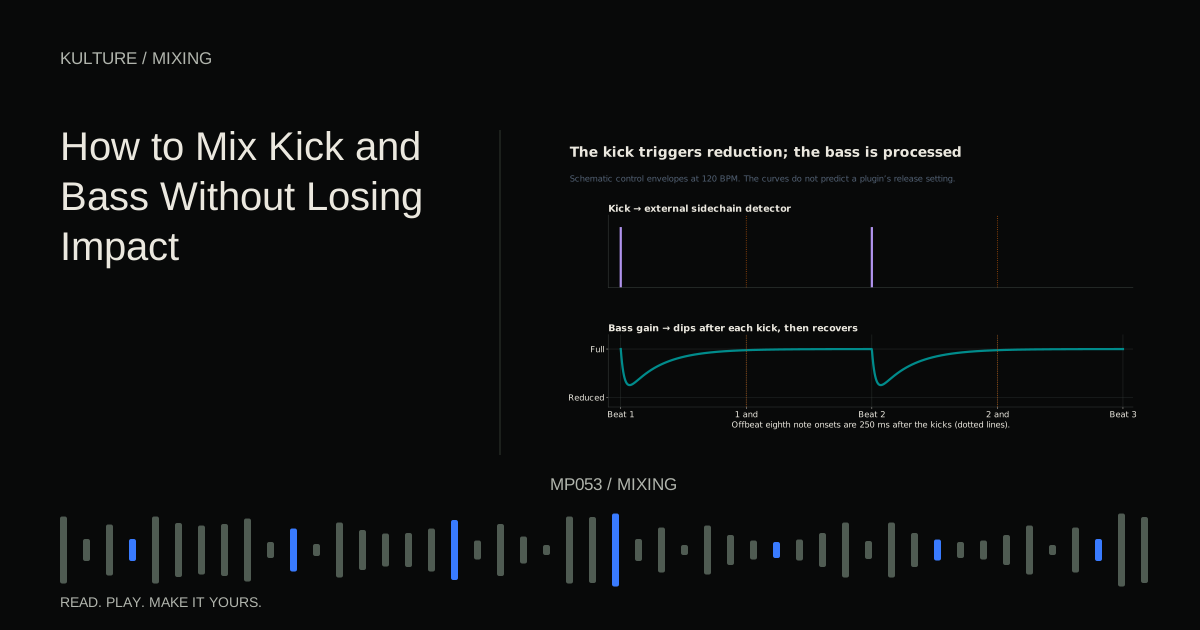
The detector is the part that measures the control signal. A sidechain is the path feeding that detector. Normally the compressor listens to the audio it processes, but an external sidechain can let another track trigger it. For example, a kick can cause a bass compressor to reduce the bass briefly.
Hear compression on a repeatable pattern
Create a drum or pluck pattern with alternating stronger and weaker hits. If you use MIDI, try velocities of 110 and 70, assuming the instrument responds meaningfully to velocity. Leave enough space to hear the tails.
Insert a compressor with a moderate ratio, perhaps 3:1 for this exercise. Start with a relatively slow attack and moderate release. Lower threshold until the stronger hits show a few decibels of gain reduction while weaker hits receive less.
Now make attack much faster while keeping other settings unchanged. Listen for the front edge becoming more controlled or less exciting. Restore the slower attack, then shorten release. Listen to the body and the recovery before the next hit.
The meter confirms that reduction is happening, but it cannot decide whether the rhythm improved. Choose a setting based on the shape you hear, then adjust output gain for a fair bypass comparison.
Separate uneven phrases from uneven peaks
If one entire vocal phrase is quieter, volume automation or clip gain may solve it more directly than heavy compression. If a few syllable peaks jump out within otherwise balanced phrases, compression may help.
A compressor reacts according to its detector, not the importance of a word. Loud breaths or low plosives can trigger reduction in ways that make a vocal less clear. Editing, filtering the detector when supported or changing the source balance may be necessary.
Do not add a second compressor merely because the first cannot solve a performance level issue. First identify whether the problem is timing, phrase balance, tone or an isolated event. Different problems need different tools.
Common signs that you have gone too far
If the track becomes louder but less expressive, compare at matched level and consider less reduction. If cymbals or reverb surge after every kick, release and detector behaviour may be creating pumping. That can be intentional, but it should match the musical goal.
If a bass sounds distorted, lengthen the fastest timing settings and reduce the amount to test whether the compressor is responsible. If nothing changes, check distortion elsewhere in the chain and whether the source itself clips.
For practice, save two versions of the same loop: one that controls peaks transparently and one that pumps deliberately. Describe the audible difference in one sentence before looking at the settings. Then explore mixing kick and bass to apply detector routing to a real arrangement problem.
TAKE IT INTO YOUR OWN MUSIC
Your next session.
If the track becomes louder but less expressive, compare at matched level and consider less reduction. If cymbals or reverb surge after every kick, release and detector behaviour may be creating pumping. That can be intentional, but it should match the musical goal.
Notes and progress stay in this browser.