This exercise creates a four minute piece from three sources: a soft sustained harmony, a self recorded everyday sound, and a sparse high note. You can work without a metronome, but a slow grid can make editing easier. Set the session to 60 beats per minute in 4/4 so each bar lasts four seconds.
Choose a listening intention
Decide what kind of attention the piece invites. Is it a close, detailed headphone study, a gently changing background, or an uneasy cinematic space? Those are different goals. “Relaxing” is not an automatic property of quiet or slow music.
For this example, aim for a calm but slightly unresolved space. Use D, A, and E as the opening pitch collection. Without an F or F sharp, the harmony does not immediately declare a conventional minor or major triad. The open sound leaves room for later color.
Native Instruments' ambient production article discusses atmosphere as something shaped through several production choices. The following timeline and musical material are an original exercise.
TRY IT HERE
Shape one sound
Compare the attack, tail and filter on the same note.
Ready when you are. Audio starts only when you press Play.
Keep experimenting in the beat maker LabBuild a pad that can sustain interest
Use a basic synth with a soft waveform or gently filtered sawtooth. Set a slow amplitude attack, perhaps two to four seconds, and a release of several seconds. These values are starting points; if the sound takes too long to become audible, shorten the attack.
Play D and A in a middle register with E above. Keep the notes widely enough spaced that the low region does not become cloudy. Add a quiet second oscillator only if it enriches the sound without making the pitch unstable.
Move the filter cutoff slowly over twenty or thirty seconds. A low frequency oscillator, or LFO, can create periodic movement, but a manually drawn curve may feel less obviously repetitive. Avoid adding random movement to every parameter. The listener needs some stable features to perceive the change.
Check the pad dry before adding a large reverb. If it has no interesting tone or phrasing on its own, reverb may make it longer without making it more compelling.
Turn a personal recording into texture
Record a harmless sound you can control, such as paper moving, a brush across fabric, or water poured into a bowl. Avoid capturing private conversations or identifiable third party performances. Record several seconds of clean material and keep the original.
Choose a segment with a useful evolution: a scrape that becomes smoother, or a splash that thins into droplets. Stretch it or slow playback, comparing the results. Slowing playback lowers pitch and lengthens the recording; time stretching can alter length without the same pitch change.
Add fades at the boundaries. If looping it, crossfade the end and beginning so the join does not click. Listen for a repeating bump that reveals the loop every few seconds. Either change the loop point or embrace the pulse deliberately.
Place this texture quieter than the pad at first. It should add a sense of material and motion, not automatically become constant noise across the entire piece.
Introduce a sparse melodic landmark
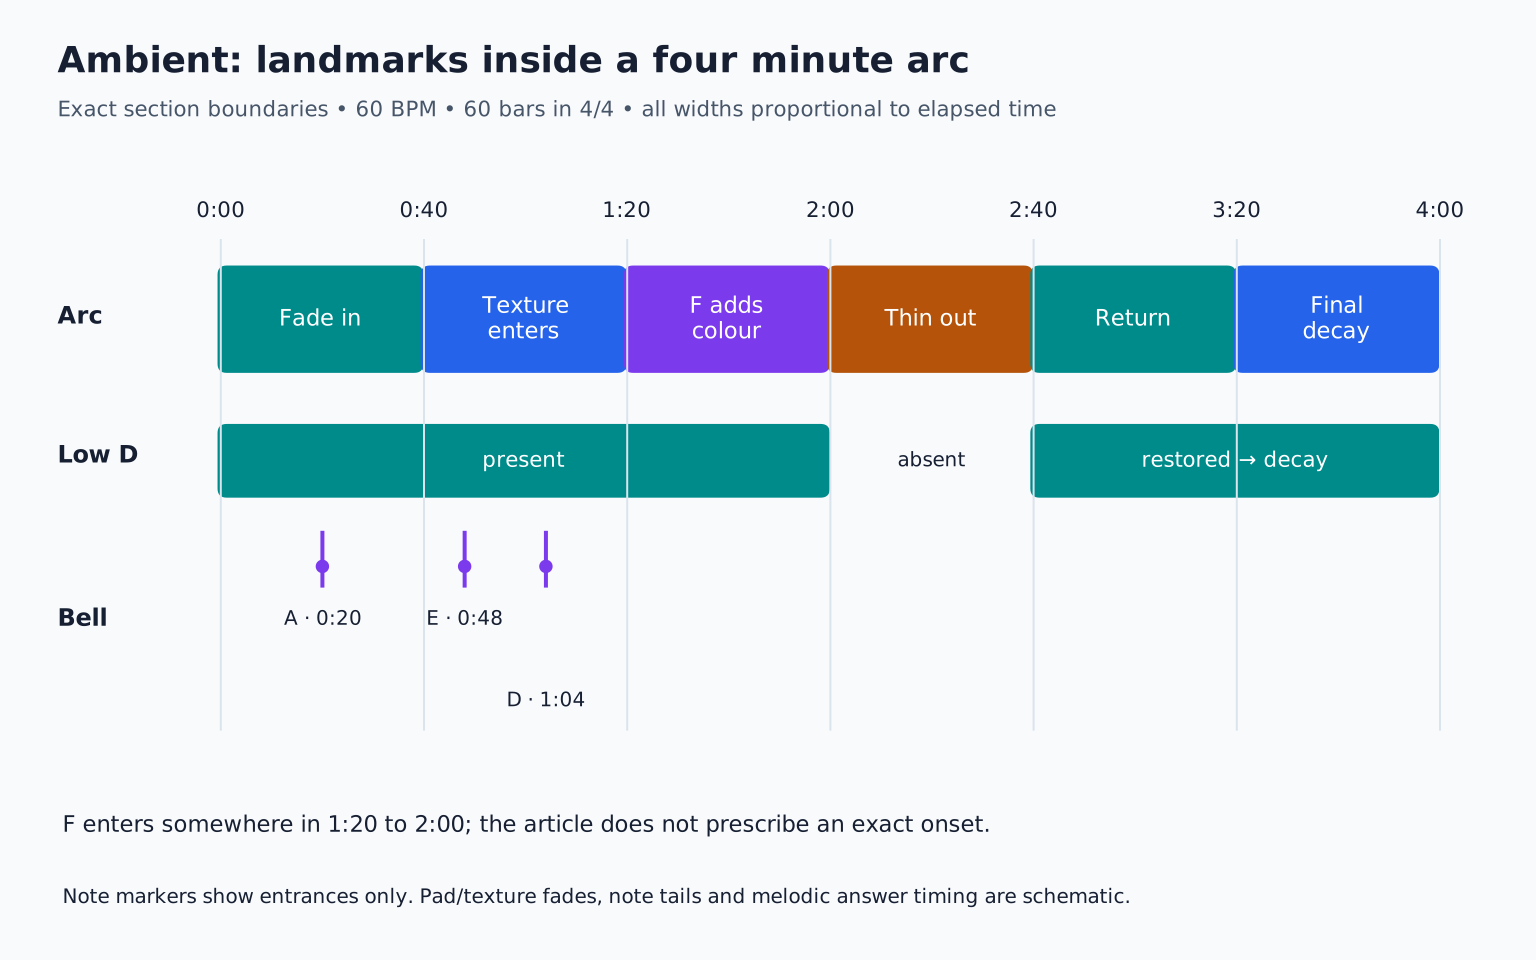
Choose a bell like or soft piano sound. Play A after about twenty seconds, E after another twenty eight seconds (0:48), and D after another sixteen (1:04). Let each note decay before deciding whether another is needed.
Later, introduce F once. Against D and A, that note suggests D minor and changes the emotional color. Its impact depends on the listener having spent time with the more open collection first. This is a harmonic event even though only one note changed.
Do not quantize these entrances merely because a grid is visible. Move one slightly earlier or later and judge the phrase as a breath. If the spacing feels arbitrary, establish a loose repeating interval and vary it only at a meaningful moment.
Shape a four minute arc
Use sixty bars at 60 BPM, or approximately four minutes:
| Time | Development |
|---|---|
| 0:00 to 0:40 | Pad fades in; first isolated A appears |
| 0:40 to 1:20 | Recorded texture becomes audible; E and D provide landmarks |
| 1:20 to 2:00 | Add F quietly; texture gains detail and pad becomes brighter |
| 2:00 to 2:40 | Remove the low D; leave upper notes and more space |
| 2:40 to 3:20 | Restore D, now with a softer texture and a clear melodic answer |
| 3:20 to 4:00 | Stop new notes gradually; allow a deliberate final decay |
This is an arc of disclosure, tension, thinning, and return. You can make it subtler, but each stage should change something you can hear. If a section has no development, decide whether its stillness is rewarding or merely unfinished.
Use reverb as an environment
Send pad and bell to a shared reverb to place them in a related space. Keep enough dry sound that their beginnings remain identifiable. A second, different reverb can separate foreground and background, but start with one so you understand its contribution.
Long decay times can accumulate low frequency energy. Listen to the reverb return alone, then in the full piece. Reduce unwanted low buildup or shorten decay where harmony changes. A sustained old chord can clash with a new one even if the MIDI notes do not overlap.
Avoid turning feedback or decay controls to extreme values without monitoring the level. Effects can build unexpectedly. Work at a comfortable volume and lower the return before experimenting with resonant or self sustaining behavior.
Detail is not the same as density
If the piece feels empty, first make one existing layer evolve more clearly. Change its register, remove a note, expose its dry texture, or let a previously hidden sound emerge. Adding another pad can make the piece less detailed by covering what was already there.
If it feels monotonous, compare sections separated by a minute. Can you identify changes in pitch collection, density, space, or brightness? If not, design one audible event. If it feels restless, slow or remove some automation rather than lengthening every reverb.
Verify the ending and practice restraint
Export beyond the last MIDI note so the intended decay is included. Listen for an accidental abrupt cutoff, background clicks, and a final tail that continues long after its musical purpose ends. Silence at the end can be intentional, but choose its length.
Your exercise is to remove one of the three sources for an entire minute while keeping the piece engaging. This tests whether timing and transformation can carry the music. Then explore granular synthesis for another way to reshape recordings, and automation for controlled movement across long spans.
TAKE IT INTO YOUR OWN MUSIC
Your next session.
Export beyond the last MIDI note so the intended decay is included. Listen for an accidental abrupt cutoff, background clicks, and a final tail that continues long after its musical purpose ends. Silence at the end can be intentional, but choose its length.
Notes and progress stay in this browser.