The bass can be the main hook or a quiet foundation. Decide which role you need before filling the piano roll. A busy lead vocal often benefits from a restrained bassline, while a sparse instrumental may leave room for a bass riff to carry the identity.
Establish the musical frame
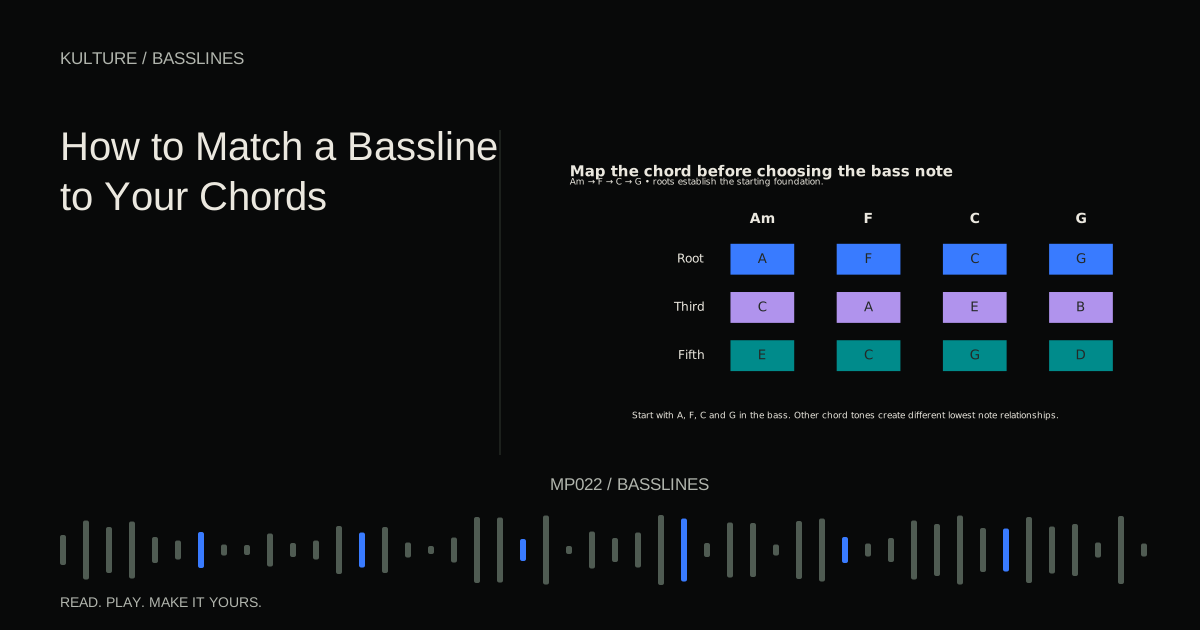
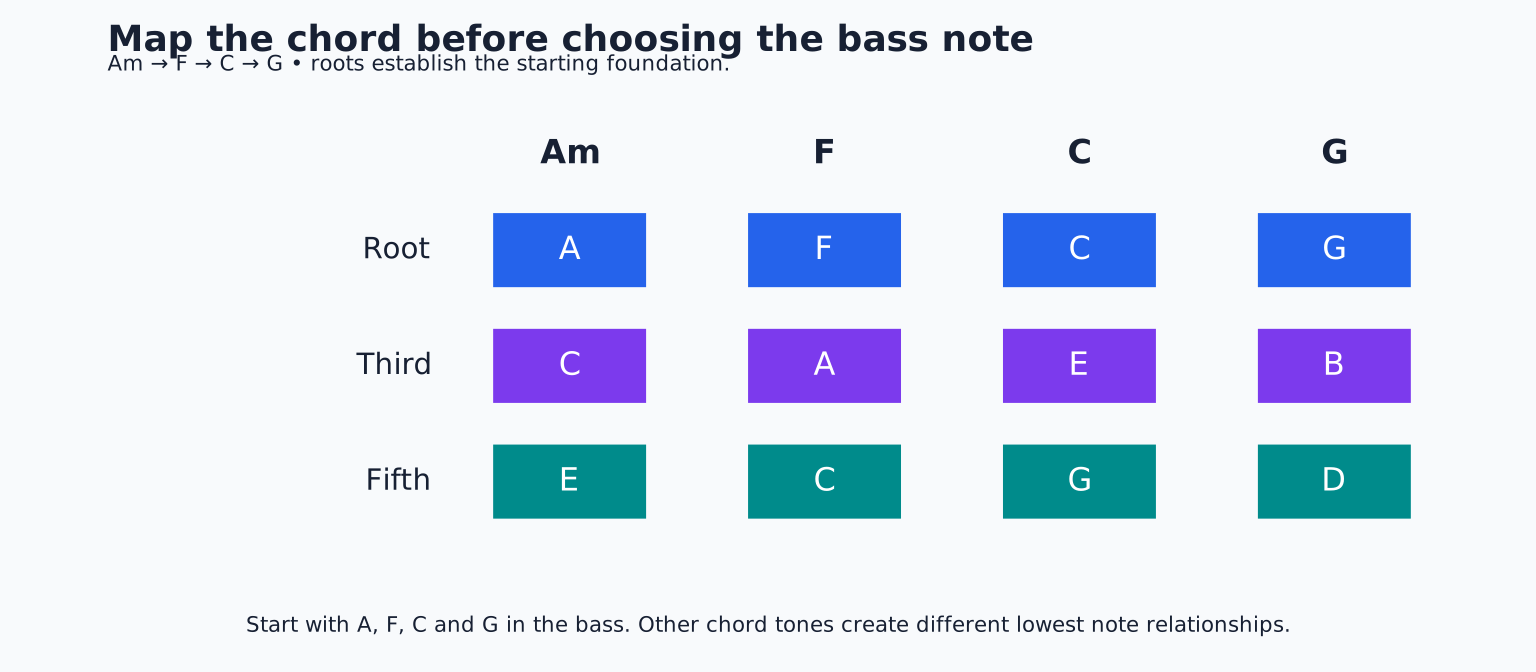
For this lesson, create four bars in 4/4 at 100 BPM. Use the chords Am, F, C, G, one chord per bar. The notes are A, C, E, F, A, C, C, E, G and G, B, D. These chords share the C major/A natural minor note collection, though the arrangement can emphasize one tonal center more strongly than the other.
Load a plain, monophonic bass sound. Monophonic means it plays one note at a time. Choose a sound with a clear pitch and moderate tail; avoid a complex preset with an automatic arpeggiator or extreme pitch modulation while learning the notes.
Ableton's bassline playground provides an interactive place to hear low melodic patterns. The exercises here focus on writing your own part against a specific chord sequence.
TRY IT HERE
Give the bass some space
Tap steps to add rests. Change the register or slide.
Ready when you are. Audio starts only when you press Play.
Keep experimenting in the piano LabBegin with the roots
The root is the note that names a chord. For Am, F, C, G, use A, F, C and G. Place one bass note at the start of each bar, lasting the full bar. This is a harmonic map, not necessarily your finished performance.
Use a register that sounds clear on your instrument. As an initial MIDI example, try A at note 45, F at 41, C at 48 and G at 43. These are specific pitch instructions; octave labels may differ between DAWs. If the sound is too low or too high, move the entire line by an octave and compare.
Listen with the chords. The bass should clarify their movement. If the notes sound wrong despite matching the roots, check sample tuning and instrument transposition. A correctly placed MIDI note can still trigger a wrongly mapped sample.
Give the notes useful endings
Shorten each bass note to two beats, leaving beats 3 and 4 empty. Now the chord continues while the bass releases. Compare that open version with the full bar version.
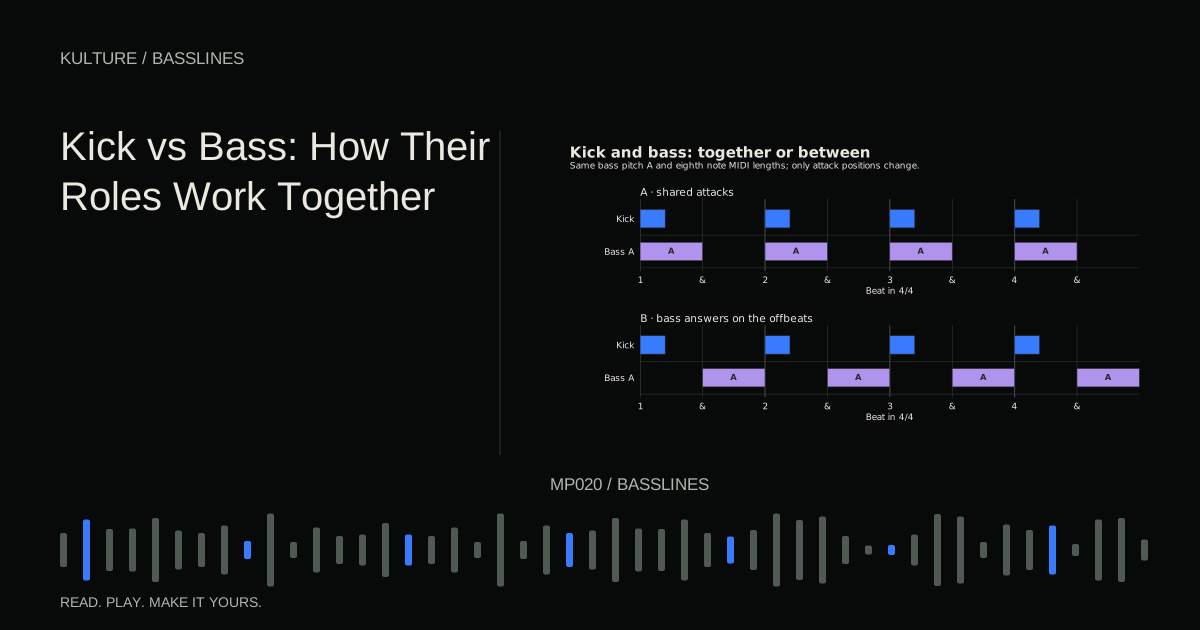
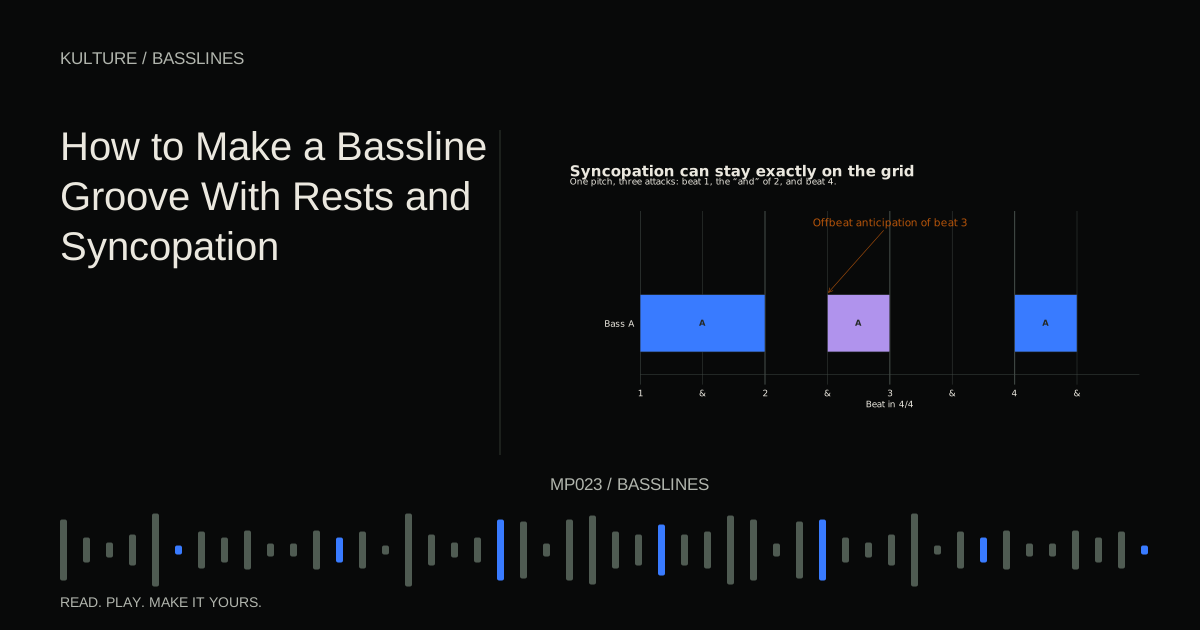
Next use a one beat note on beat 1 and a half beat note on the “and” of beat 2. Count “1 and 2 and 3 and 4 and.” The second attack sits between beats and ends at beat 3. This creates an answer to the first note while leaving a longer gap afterward.
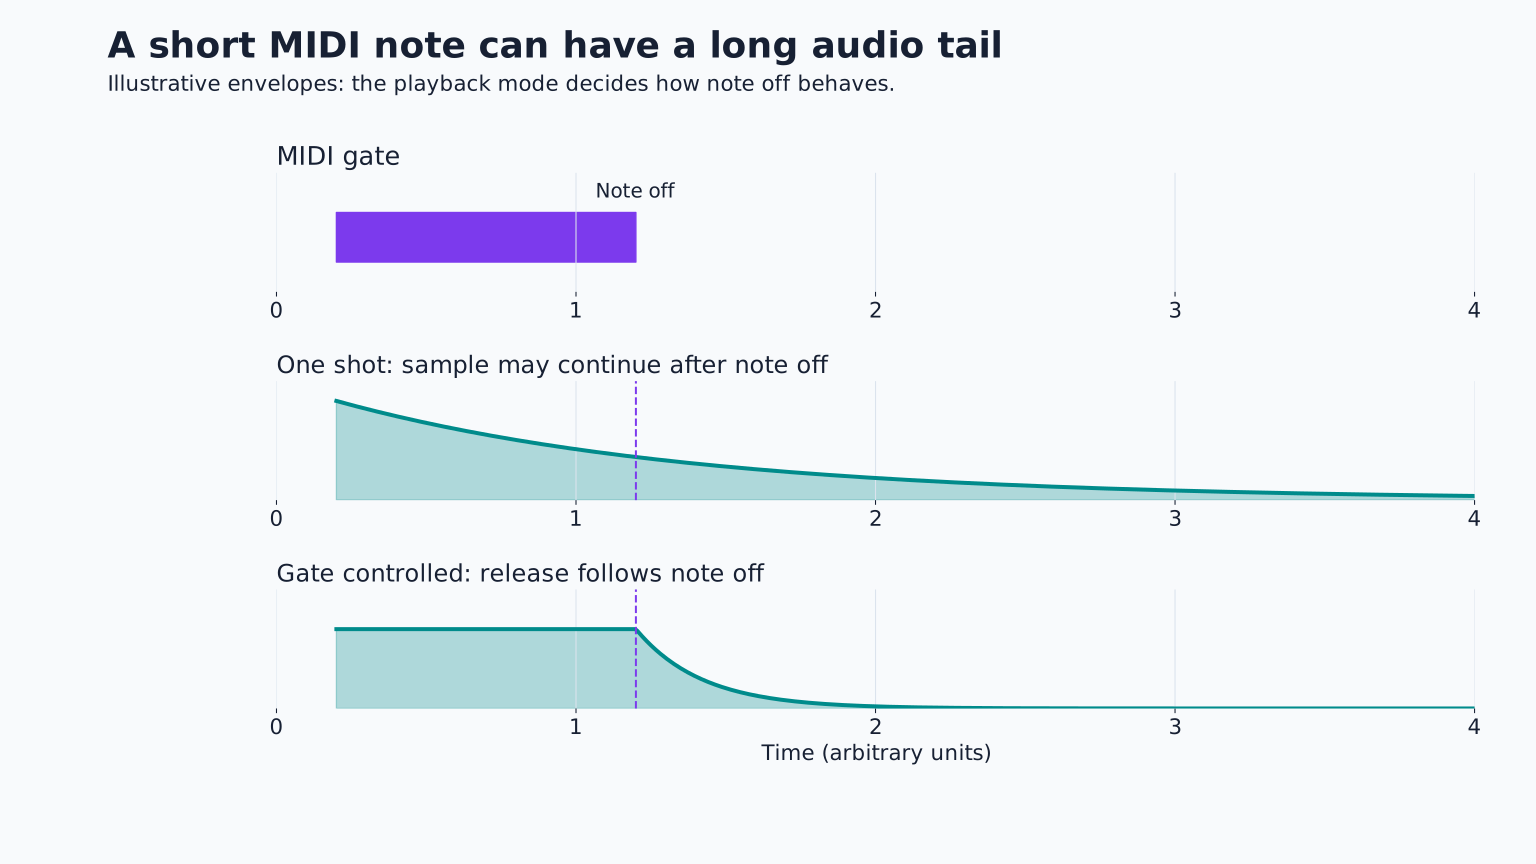
The audible ending depends on the instrument's release, the fade after the MIDI note ends. If a note keeps ringing into the next attack, shorten the release or choose a more appropriate sound. A tiny visual gap in MIDI may not produce a real gap in audio.
Rests are active arrangement choices. They make the return of a bass note more noticeable and give the kick room to speak.
Listen to the kick relationship
Add a kick on beats 1 and 3, with a snare on 2 and 4. Your first bass note coincides with a kick, while the second bass note answers between kicks. This combines shared impact with rhythmic separation.
Try moving the second bass attack from the “and” of beat 2 to beat 3. Does the doubled kick and bass event feel stronger, or does it become crowded? Return to the offbeat if it better supports the groove.
Frequency masking occurs when one sound makes another harder to hear. iZotope's masking explanation discusses why overlapping material can reduce clarity. But timing and note length are compositional solutions you can try before using processing.
Do not automatically make the kick and bass alternate. Some tracks depend on their simultaneous attacks. Your task is to decide which combination gives the intended weight and motion.
Add octaves without changing the chord identity
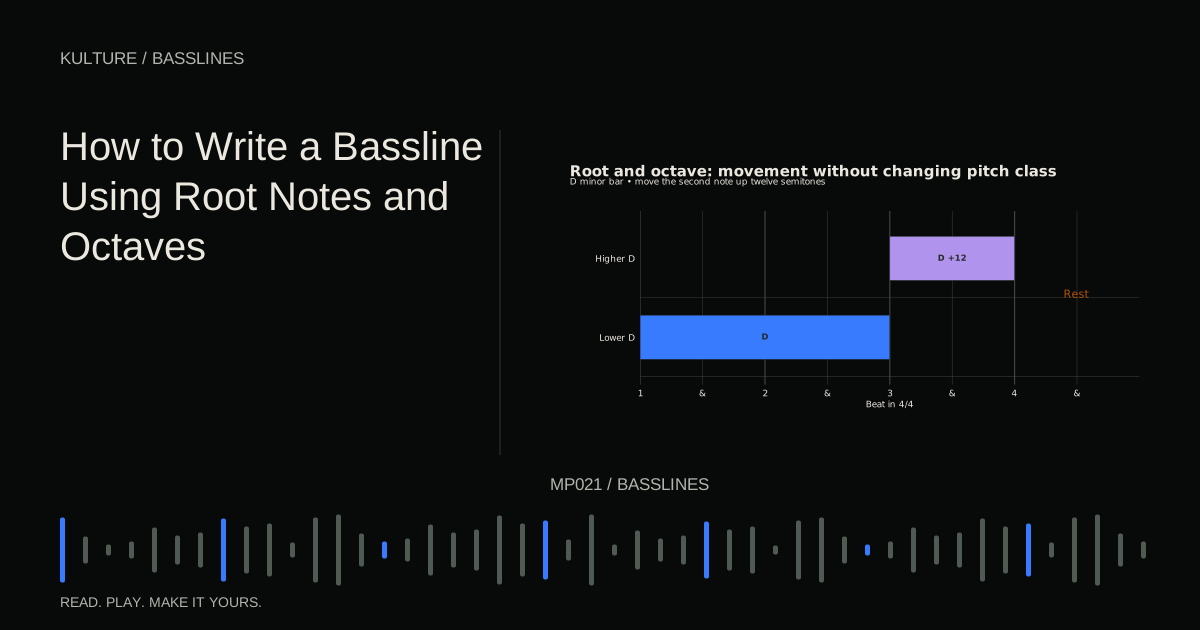
Keep the first root low. Move the second bass note up twelve semitones. In the A minor bar, low A answers with higher A. The pitch class remains A, but the line gains a contour.
Use the octave answer only in bars 2 and 4 at first. If every short note jumps upward, the gesture can become predictable or excessively busy. A variation is more noticeable when a stable version exists beside it.
An octave jump can also change the sound's envelope and brightness, especially with a transposed sample. Listen to the actual result rather than assuming the upper note is merely a quieter or lighter copy.
For a focused exercise, see Root Notes and Octaves.
Bring in fifths and passing notes
The fifth is another chord tone that often offers a stable contrast. Over Am, the fifth is E. Try A on beat 1, E on the “and” of beat 2 and A on beat 4. Over F, use C as the fifth; over C, use G; over G, use D.
Now add one short approach note before a chord change. In the last half beat of the G bar, play B and resolve upward to C only if the next chord is C. In our loop, the next chord is Am, so a short G leading to A is a simpler stepwise approach. The destination matters more than memorizing a stock passing note.
A passing note connects more stable notes, often by step. Keep it short and listen to what it crosses harmonically. A note that works as a quick transition may feel awkward if held for two beats.
Do not add every available scale note. Chord tones establish the structure; passing notes decorate or connect it. How to Match a Bassline to Your Chords explains this hierarchy in more detail.
Make a four bar phrase rather than one bar repeated four times
Keep bars 1 and 2 rhythmically similar so the listener learns the pattern. In bar 3, omit the second attack. In bar 4, add a short pickup on the final eighth note leading into the returning A.
This creates a small arc: statement, confirmation, space, return. The exact arc is optional, but thinking in phrases prevents the line from becoming an endless collection of unrelated variations.
Listen across the loop boundary. A pickup that seems clever in bar 4 may make the next A arrive too soon or too weakly. Shorten the pickup or leave the last sixteenth empty if the return needs more definition.
Choose articulation to support the role
A plucked bass with short decay emphasizes attacks and gaps. A sustained sub bass emphasizes continuity and weight. A distorted bass adds upper harmonics, making its rhythm and pitch easier to notice on some playback systems, but it can also compete with chords and vocals.
If the bass is supposed to support the track, do not choose a sound that demands attention on every note. If it is the hook, allow more midrange character and leave space elsewhere.
Compare sounds using the same pattern at similar perceived levels. Then adjust note lengths for the chosen sound. A performance written for a dry electric bass patch may need changes when transferred to a long 808 style sample.
Diagnose problems in a useful order
If the line sounds harmonically wrong, check the chord roots, then the instrument tuning, then the passing notes. If it sounds boring, try rhythmic variation before adding pitches. If it sounds cluttered, remove notes and shorten releases before using equalization.
If some notes vanish while others boom, test an octave change and listen on another familiar playback system at a comfortable level. The instrument, room and speakers can all contribute. Do not compensate for a room problem by drawing random volume changes into the composition.
If the line works alone but fights the track, soloing has stopped being useful. Play drums, chords and melody together and decide which bass events actually need to remain.
Before committing, try one deliberate contrast: keep the drums and chords identical, but play the bass only on each bar's first beat. This sparse comparison reveals which extra events genuinely improve the phrase. Restore notes one at a time. If an event does not improve the groove, clarify a chord change or support an arrangement gesture, consider leaving it out.
Develop the sketch into an eight bar part
Duplicate the four bars. In the second pass, preserve the basic rhythm but change only the final approach into the loop. You might omit the last G attack entirely so the returning A feels more decisive.
Record three versions: roots only, roots plus octaves, and the chosen line with one passing gesture. Listen without looking at the editor. Keep the version that communicates the chord movement and groove most clearly, even if it contains fewer notes.
Your next exercise is to write the same line under Dm, B flat, F, C, adjusting roots and fifths while preserving its rhythm. That tests whether you understand the relationships rather than only a memorized shape. When you are ready to create more space and propulsion, continue with Rests and Syncopation.
TAKE IT INTO YOUR OWN MUSIC
Your next session.
Duplicate the four bars. In the second pass, preserve the basic rhythm but change only the final approach into the loop. You might omit the last G attack entirely so the returning A feels more decisive.
Notes and progress stay in this browser.